
")
- Details
- Written by: Super User
- Category: Blog
- Hits: 2880
Tutorials CLUB ALPINO MADRILEÑO

CLUB ALPINO MADRILEÑO, a club with more than 3000 members, in the Community of Madrid and other Autonomous Communities, offers users of the natural environment, OruxMaps and IGN Maps of Spain Mini-Tutorials, for the training of people interested in expanding their knowledge about of the operation of the application, from its YouTube channel. https://www.youtube.com/channel/UC3UEi-rv3S72iMQm_ZDIzfA/videos
1.-INSTALLATION of IGN MAPS OF SPAIN and ORUXMAPS from PLAY STORE
https://www.youtube.com/watch?v=G52LQN7BUK8
2 DOWNLOAD ORUXMAPS from the WEB of the AUTHOR, José Vázquez
https://www.youtube.com/watch?v=wYXAozNDMhk
3.-QUICK DESCRIPTION OF THE ELEMENTS IN THE INITIAL SCREEN.
https://www.youtube.com/watch?
4.-OPEN IGN Maps of Spain, ACTIVATE GPS, RECORD TRACK, STOP RECORDING, SAVE TRACK.
https://www.youtube.com/watch?v=GxWrOMuwEFY
5.-CONTINUE RECORDING A TRACK STARTED, AFTER A PAUSE.
https://www.youtube.com/watch?v=mJGAs-Dct_A
6.-THE VECTOR OF COURSE AND DISTANCE.
https://www.youtube.com/watch?v=9BKlejEbV7U
7.-CREATE A WAYPOINT, KNOW ITS COORDINATES AND ITS POSSIBILITIES.
https://www.youtube.com/watch?v=Q1yTbgc3Fj0
8.-SHARE THE STATISTICS OF THE TRACK, THE SAME TRACK AND THE LOCATION.
https://www.youtube.com/watch?v=anMDEaqCct0
9.-OPEN A SAVED TRACK/ROUTE TO FOLLOW IT, RECORD A NEW TRACK AND ITS POSSIBILITIES.
https://www.youtube.com/watch?v=mxDt6z8jVnQ
10.-NAVIGATION WITH ALARMS.
https://www.youtube.com/watch?v=bMqyXyI10oY
11.-CREATE A MAP.
https://www.youtube.com/watch?v=MSV7SoJzKDg
12.-DOWNLOAD MAPS USING THE IGN MAPAS DE ESPAÑA APP.
https://www.youtube.com/watch?v=e9Bjpy00G-E
13 DOWNLOAD MAPS FROM ORUXMAPS.
https://www.youtube.com/watch?v=XhDHwKOQgns
14 MAP & THEMES DOWNLOADED FROM ORUXMAPS (OPENANDROMAPS).
https://www.youtube.com/watch?v=tgd_QpsA8iA
15 DOWNLOAD MAPS AND THEMES FROM OPENANDROMAPS FOR ORUXMAPS AND MAPAS DE ESPAÑA.
https://www.youtube.com/watch?v=ONURMtDQA1M
16 DOWNLOAD MAP AND FREIZEITKARTE STYLE FROM THE ORUXMAPS APP.
https://www.youtube.com/watch?v=MmcYCrLSBaY
17 CREATE ONLINE COMPOSITE MAPS IN THE ORUX MAPS APP AND IGN MAPS OF SPAIN.
https://www.youtube.com/watch?v=cl84uWxBSNo
18 ERASING MAPS, TRACKS AND WAYPOINTS.
https://www.youtube.com/watch?v=sJyM6iPbiwY
19 SIDE BUTTON CONFIGURATION.
https://www.youtube.com/watch?v=HgR1dKzaBXs
.....WILL CONTINUE.....
- Details
- Written by: Super User
- Category: Blog
- Hits: 5619
Edit a Track

With this tool you can modify your Tracks, adding/removing/moving Track points or Waypoints.
In the list of your Tracks, click on one of them -> properties -> edit
More: Track edition
- Details
- Written by: Super User
- Category: Blog
- Hits: 21198
DEM files
They are files that contain the altitude of a grid of points in a certain area of the Earth. They allow you to know the altitude of any point of the map, without needing to be at that point, where you would get it from the GPS.
These files are used by OruxMaps for various functions:
- Draw relief maps, shadows and slopes. They are maps that you can activate in global settings -> Maps -> Maps based on DEM. These maps can be viewed alone, or used to create composite maps with them.
- Know the altitude at any point on the map. You can visualize an specific control for it in global configuration -> user interface -> dashboard -> dashboard controls -> altitude (DEM). This control will appear in the lower control panel. If you move the map, you will see the altitude at the center point of the map.
- Use that altitude instead of the altitude provided by the GPS. GPS is pretty bad at providing altitude. You can make the app use the altitude provided by the DEM files instead of the GPS in global configuration -> sensors -> GPS -> altitude from DEM files. In this way you will correct the wrong altitudes given by the GPS.
- Calibrate the barometer. If your device has a barometer, you will need calibration from time to time. You can have it use the DEM files in global configuration -> sensors -> GPS
- Visualize the map in 3D. 'Maps' button of the map viewer -> Tools -> 3D viewer. This button allows you to automatically download the DEM if the app can not find them, you should see a dialog asking if you want to download the files.
- Correct the altitude of Tracks, if it is not correct. In the list of your Tracks, press one -> Properties -> Correct altitudes. Select the option to correct with DEM files.
As you can see, there are many utilities with those files.
You can find them of different qualities. How much better they are, more size they have. OruxMaps downloads those provided by NASA, which have a mesh of 90 meters (3 seconds) between points. You can get better, here are some links:
orux
- Details
- Written by: Super User
- Category: Blog
- Hits: 5933
GepoPDF maps
OruxMaps supports now GeoPDF format.
It is a standard format that is becoming very common since the data can be vectorial data, which optimizes storage and presentation by layers.
Example of maps of this type is the possibility to download free maps in the USA, directly in the store: https://store.usgs.gov/map-locator
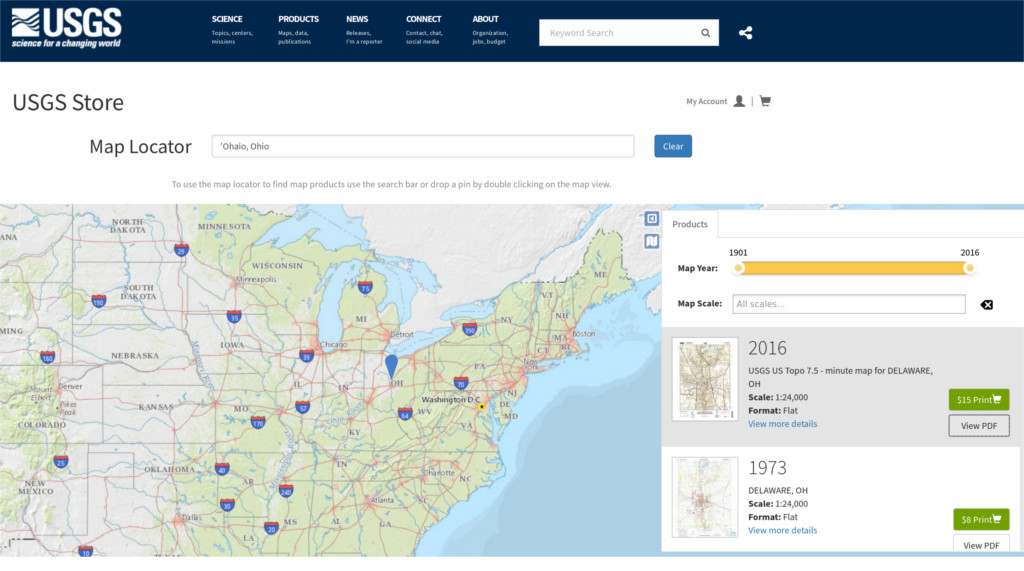
Just by entering a text in the locator, the website provides you with the pdf that you can download.
Once we download the pdf, we copy it in the map list of OruxMaps oruxmaps/mapfiles/ refresh the list of offline maps, and we already have a new map available.
- Details
- Written by: Super User
- Category: Blog
- Hits: 4967
Exclusion zones and geofences
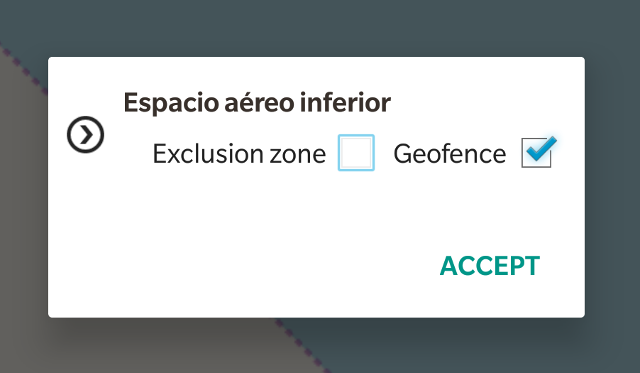
You can use polygons loaded from KML, KMZ or SHP files to delimit areas where you don't want to enter, or from where you don't want to leave.
You can also use the drawing tool to delimit those zones of security or exclusion.
How?
1.-Starting from a KMZ or KML file.
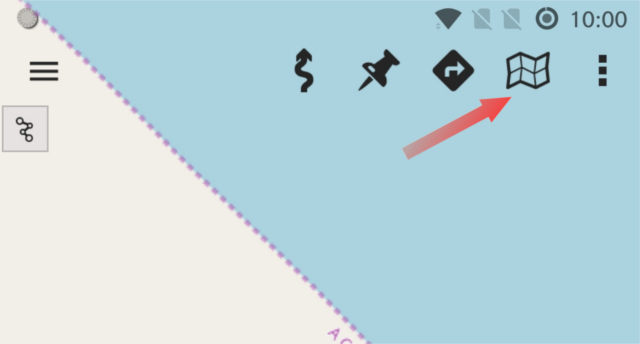
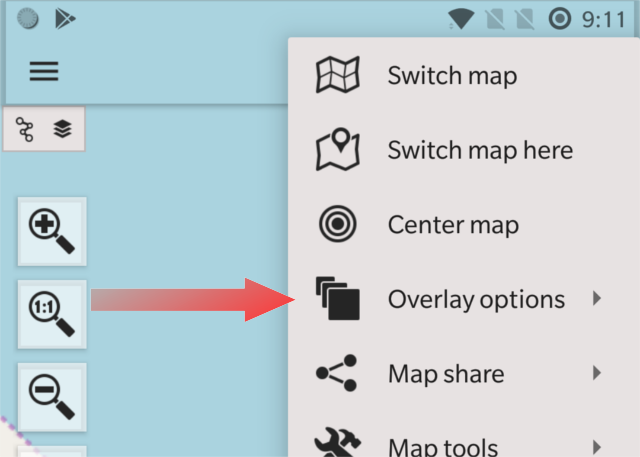
a) From the map viewer, 'maps' button:
b) Select 'Overlay options' -> 'Load KML/SHP overlay', then browse with the file manager, and load the file containing the polygons.
c) Once the polygons are loaded, again button 'maps' -> 'Overlay options' -> 'Tweak layers'. You will get a dialog in which, for each polygon file, or each folder contained in the file, you can select the options 'geofence' and 'exclusion zone'. Once you activate the GPS, if you enter / exit one of these areas, the app will warn you with a beep.
1.-Drawing your own polygons.
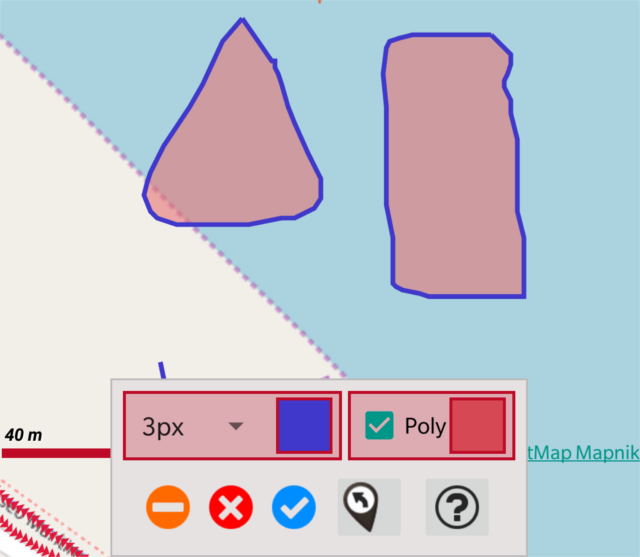
a) From the map viewer, 'maps' button.
b) Select 'Overlay options' -> 'Draw overlay', then a tool is presented that allows you to draw polygons with your finger on the map (press the 'polygon' option so that the app automatically closes the paths). You can use different line colors and line thickness. Once you finish painting, click on 'OK' and what you have painted is incorporated into the map as a overlay.
c) Once the polygons are loaded, again button 'maps' -> 'Overlay options' -> 'Tweak layers'. You will get a dialog in which, for each polygon file, or each folder contained in the file, you can select the options 'geofence' and 'exclusion zone'. Once you activate the GPS, if you enter / exit one of these areas, the app will warn you with a beep.
- Details
- Written by: Super User
- Category: Blog
- Hits: 9116
WMTS online maps
The WMTS are very efficient online maps, more than the WMS, because the tiles are already built, and their download is very fast.
It is usual for geographic services in many countries to offer free access to their maps through this type of online maps. Here you can find WMTS examples: http://www.oruxmaps.com/cs/es/maps but surely if you google 'geographical service of my country WMTS' you will find interesting WMTS sources.
To use these maps in OruxMaps it is necessary to know the URL (the Internet address) to the map.
We are going to build a WMTS from this URL: gibs.earthdata.nasa.gov
Steps:
0.-Copy the URL from the browser to the clipboard.
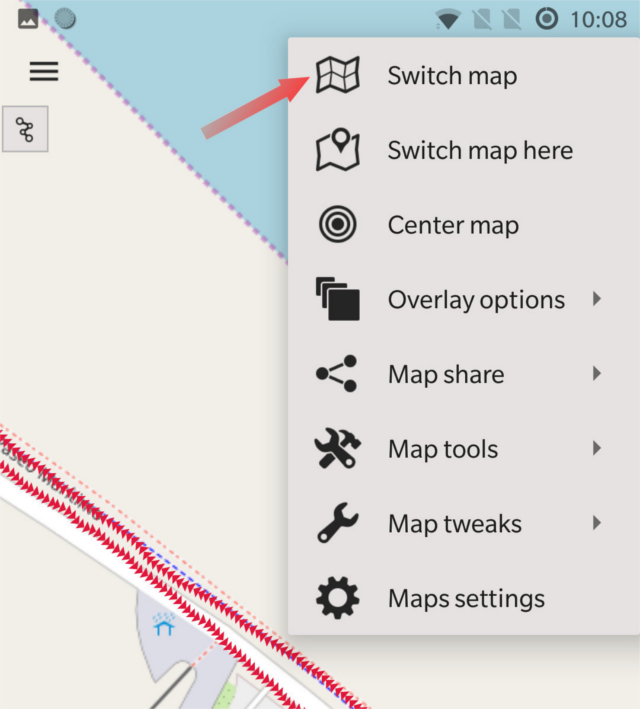
1.-Click 'Maps' button:
2.-Go to the list of maps, 'Switch map' option:
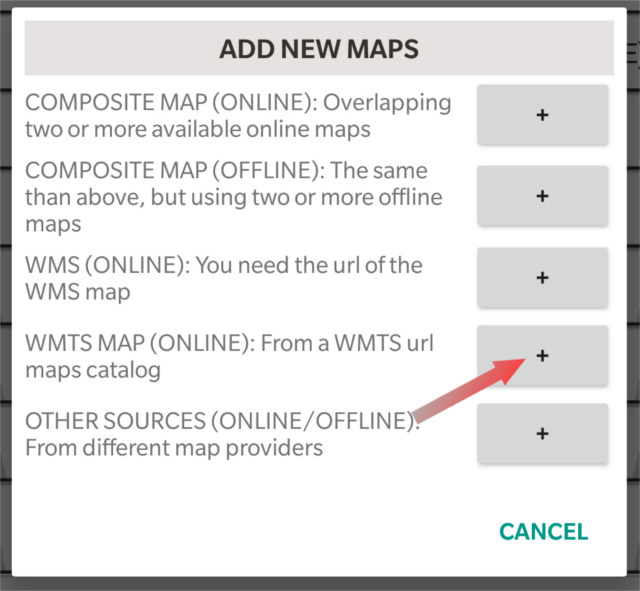
3.-In the map list, click the '+' button:
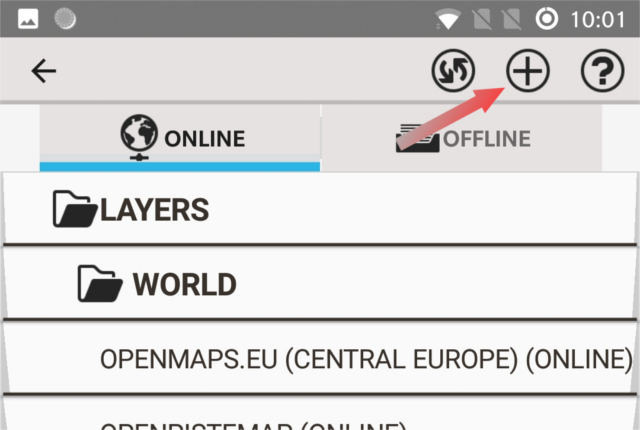
4.-Select the option to create a WMTS:
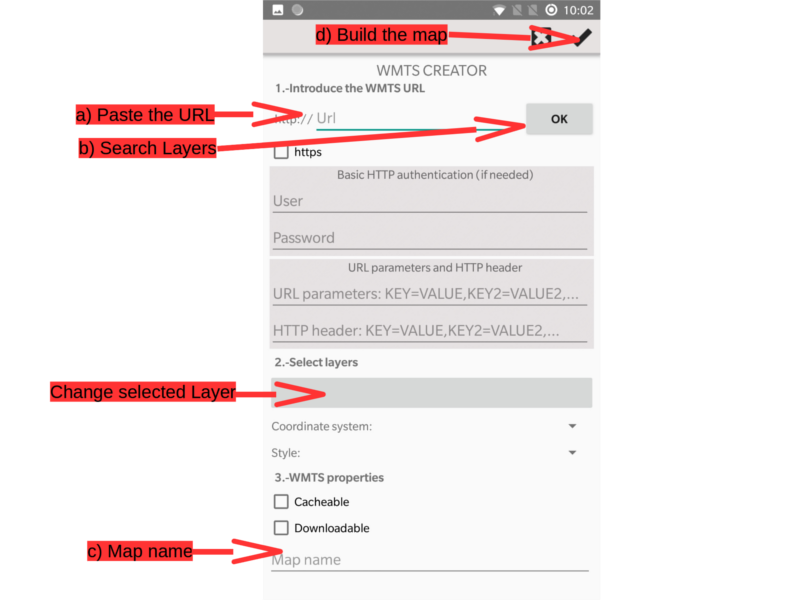
5.-In the WMTS creation screen:
- Paste the WMTS URL in the 'Url' text box and press 'OK'.
- If everything goes well, you will see a list of all the layers that WMTS offers. The one we have chosen from NASA has hundreds of layers! Select a layer, which will appear in the 'Select layer' box. If you want to change to another layer, you have to press that button, to select another one.
- If you want the images to be saved in the internal cache of the app (for offline use, for example) you click on the 'WMTS properties' step the cacheable option. If you want this map to be used to create offline maps, you have to click the 'downloadable' checkbox.
- Fill a name for the map, finally click the button 'OK' in the upper buttons bar, and the map should appear ready for use in the list of maps online -> WMTS.
Other options:
1.-If the server requires authentication (user and password) they must be entered in their corresponding boxes.
2.-If the server requires additional http headers (for example, 'Referer', 'User-Agent' or similar) they can also be configured in their boxes.
Doubts? In the forum: http://oruxmaps.com/foro/